Hi Guys,
For quite some time, Firefox was giving a lot of problems while watching YouTube and screen sharing on Google Meet, Teams, and Zoom. There was high CPU usage, sometimes going above 100 percent. Either I had to wait for some time for it to come back to normal or sometimes there was a complete freeze and had to hard reboot the system. I searched over the internet for enabling the HW Acceleration in Firefox. After multiple hits and trials, certain configurations worked for me which I am sharing with you all. Hope it will help somebody.
Thanks to ChatGPT – Enabling hardware acceleration in Firefox can significantly improve your browsing experience by offloading certain tasks to your GPU, which can help with video playback, rendering web pages, and overall performance. This guide will walk you through the necessary steps to enable hardware acceleration in Firefox on a Linux system.
Step 1: Enable Hard Acceleration via Setting
Go to Settings > Performance. Uncheck “Use recommended performance settings” and check “Use hardware acceleration when available“. Click on the image to make it bigger.
Step 2: Check the codec supported by the Graphics Card
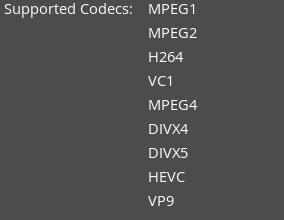
Check the codec supported by the Graphics card of your machine. It will be needed in Step 3. My laptop has an NVIDIA Graphics card and it supports the following codecs.
As you can see VP9 is supported which is the codec YouTube uses for its videos. We will enable this in the configuration below. In your case, some other codecs might be supported you need to enable those by following step 3.
Step 3: Update Firefox Configuration via about:config
about:configPlease follow the following steps and update if not already the same configurations.
- Open Firefox and type
about:config - If you see a warning message, accept the risk and continue to the advanced settings.
- Update the following configuration settings by searching for each key and setting its value as specified:
media.gpu-process-decoder: true
media.hardware-video-decoding.force-enabled: true
media.navigator.mediadatadecoder_vp8_hardware_enabled: true
media.navigator.mediadatadecoder_vpx_enabled: false
media.peerconnection.video.vp9_preferred: true
media.videocontrols.picture-in-picture.video-toggle.first-seen-secs: 1711676969
media.videocontrols.picture-in-picture.video-toggle.has-used: true
media.webrtc.hw.h264.enabled: true
webgl.enable-ahardwarebuffer: true
widget.dmabuf.force-enabled: true
widget.wayland-dmabuf-vaapi.enabled: true
media.av1.enabled: false
media.ffvpx.enabled: true
layers.acceleration.force-enabled: true
gfx.x11-egl-force-enabled: true
gfx.webrender.all: true
gfx.webrender.software.opengl: false
gfx.webrender.software: false
gfx.webrender.software.d3d11true: false
dom.maxHardwareConcurrency: 16
gfx.use-ahardwarebuffer-content: false
media.hardware-video-decoding.enabled: true
media.hardwaremediakeys.enabled: true
media.ffmpeg.vaapi.enabled: true
media.rdd-vpx.enabled: true
Simply double-click on each entry to change its value or right-click and select “Toggle” if the entry is a boolean.
Step 4: Modify the .bashrc
.bashrcAfter updating the Firefox configuration, you need to set some environment variables to ensure hardware acceleration works correctly. Follow these steps:
- Open a terminal.
- Edit the
.bashrcnano ~/.bashrc - Add the following lines to the end of the file:
export MOZ_X11_EGL=1
export MOZ_ENABLE_WAYLAND=1
export MOZ_DISABLE_RDD_SANDBOX=1
export LIBVA_DRIVER_NAME=iHD
export VDPAU_DRIVER=va_gl
export VAAPI_MPEG4_ENABLED=true
export MOZ_WEBRENDER=1
- Save the changes and exit the editor. For
nanoCtrl+OCtrl+X - Apply the changes by sourcing the
.bashrcsource ~/.bashrc
Hopefully, this will help somebody.
That’s it guys.
Hope it helped.
Have a great day ahead.
![]()


Leave a Reply